Export/Import
Export and import platform information.
Table of Contents
- What business information can I export?
- How do I export business information?
- What are the contents of the business export file?
- How do I import site, app, or API information from an export file?
- What is the import properties file and when do I need it?
What business information can I export?
You can export business information to an external file. You can then import that file to another instance of the platform. One use of this feature is to move the entire set of resources associated with a business from one environment to another, such as from a development environment to a testing or production environment.
You can choose whether or not to include the following information:
- API:
- Private Key + Certificate
- Resources / Documentation
- API Administrators
- Operational Policies
- QoS Policies
- Compliance Policies
- Scopes
- Licenses
- Apps:
- Certificate / Shared Secret
- Site Configuration:
- Site Settings
- Workflow Definitions
- Custom Styles
- Security Domains
- Login Domains
- Notification Templates (Email and Dashboard)
For instructions, see How do I export business information? below.
How do I export business information?
You can export business information to an external file. You can then import that file to another instance of the platform to replicate the entire set of information. You can use this feature to move the entire set of resources associated with a business from one environment to another, such as from a development environment to a testing or production environment.
There are many configuration options, so you can determine exactly what you want to include in the export file.
To export business information:
- Log in as the Business Admin.
- Navigate to Administration > Actions.
- Click Export.
- In the Export overlay, choose the information you want to include in the export file. For information about the options, see What business information can I export? above.
- Choose to save or open the export file.
What are the contents of the business export file?
The business export file includes all the core information about the business, as well as any of the optional additional information you specified.
The file has a very specific structure. It will look something like the image below:
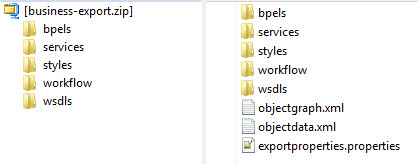
The export file will generally include the following:
- Files at root level:
- objectgraph.xml: An XML file that shows the relationships between resources.
- objectdata.xml: An XML-based summary of all the data in the export file.
- exportproperties.properties: a properties file showing which options were included in the export file.
- bpels: a folder containing XML business process files (bpel files); one for each operation, for each environment. So, for example, if the API has five operations, and runs in Sandbox and Production environments, there are 10 bpel files.
- services: a folder containing a subfolder for each environment, each subfolder containing a bpel.xml file for the applicable service/environment.
- styles: a folder containing the custom.less file with the business-specific styles (only present if custom styles were uploaded).
- workflow: custom workflow information specific to the business (only present if custom workflows were uploaded).
- wsdls: a folder containing WSDL files for the service.
How do I import site, app, or API information from an export file?
You can export site, app, or API information to an external file. You can then import that file to another instance of the platform to replicate the entire set of information. You can use this feature to move the entire set of resources and associations from one environment to another, such as from a development environment to a testing or production environment.
The import file must be a valid package file previously exported from a platform instance.
Only a Business Admin can import.
To import site, app, or API information:
- Log in as the Business Admin.
- Navigate to Administration > Actions.
- Click Import.
- Browse to the location of the export package file (ZIP file) and choose it.
- Optional: browse to the location of the configuration migration properties file and choose it. For more information, see What is the import properties file and when do I need it?
- Click Import.
What is the import properties file and when do I need it?
When you import a file, you can also provide an optional configuration migration properties file.
Migration properties allow for URL mapping of physical service endpoints between the source environment that the information was exported from and the target environment you're importing it to.
If the URL mapping is not specified, physical service endpoint URLs are migrated without any change. It is possible that the source environment URLs might not apply to the target environment, and in this case the migration properties file is needed.
URL mapping is done by URL prefix. The backslash character (\) is used to escape any special characters in the properties file, such as the colon that might appear in the URL.
If you import the package file without a properties file, APIs included in the package that are Managed Services in the source environment become Unmanaged Services in the target environment, unless the target environment contains SOA Software container instances with the same container key as in the source environment.
The migration properties file is used to handle the differences between the source environment and the target environment by transforming the contents of the export package to be suitable for the target environment.
Here are some examples of instances in which the migration properties file can be used:
- The target API endpoint is not the same in the source and target environments.
- Proxy API is hosted in an SOA Software container.
Different source and target endpoints
Instances where the target API endpoint is not the same in the source environment and target environment include:
- Different hostname—It is likely that the path portion of the URL might be the same, but with a different hostname.
- Multiple source environment endpoints—The migration properties file allows one or more source environment URL prefixes to match to one or more target environment URL prefixes. You can use this to map one endpoint of the target API to multiple endpoints for the same API in the target environment.
- Multiple target environment endpoints—Conversely, you can use the migration properties file to map multiple endpoints of the API in the source environment to a single endpoint of the API in the target environment.
- JMS—If the target API endpoint is JMS, migration properties file allows mapping to the JNDI URL.
The sample file below illustrates this scenario.
#With the properties below, all target APIs with an endpoint address of
#http://apihost-source-env:8900 will be imported with a URL of
#http://apihost-target-env:8900, keeping the path portion the same
#in both environments.

migration.url.source.http\://apihost-source-env\:8900=DiscussionAPI
migration.url.target.http\://apihost-target-env\:8900=DiscussionAPI
Proxy API hosted in an SOA Software container
Proxy APIs are hosted in SOA Software containers. It is possible that the container key in the source environment might be different from the container key in the target environment.
It is also possible that the proxy API might be hosted in a different number of ND containers in the source environment versus the target environment. However, this is rare, because most users want to host the Proxy API in an ND cluster rather than hosting in multiple NDs.
The migration properties file allows the user to map a set of ND container keys in the source environment to an alias to which multiple target environment ND containers are also mapped. This scenario allows the proxy APIs that are exported/imported to be imported into the appropriate ND containers in the target environment.
The sample file below illustrates this scenario.
#With the properties below, source-env-container-key in the source environment
#is mapped to target-env-container-key in the target environment. All proxy
#services that were hosted in source-env-container-key in the export file
#will be hosted in target-env-container-key in the target environment.

migration.container.source.source-env-container-key=acmebroker
migration.container.target.target-env-container-key=acmebroker
Additional Migration Properties: QName Matching
You can use an additional property to allow service QName matching in the migration properties file.
This property is used in cases where the databases used for package import and export include services, interfaces, and bindings with the same QName but different keys. It allows update of the existing objects based on matching QNames.
For example, if you create a physical service in both the exporting and importing databases using the same WSDL, the QNames will match, but the service keys will be different. Then, if you try to import the service from one database to another with QName matching disabled, the import process will attempt to create a new service, and will fail because duplicate QNames are not allowed.
With QName matching enabled, the import process will update the existing service, behaving exactly the same as if service keys were matching.
The sample file below illustrates use of this property in the migration properties file.
#Sets QName matching for the import environment.

migration.service.qname.matching=true
Creating the properties file
You can use any text editor to create the properties file for import.